Production Documents
There is a link below to view these documents as PDF documents.


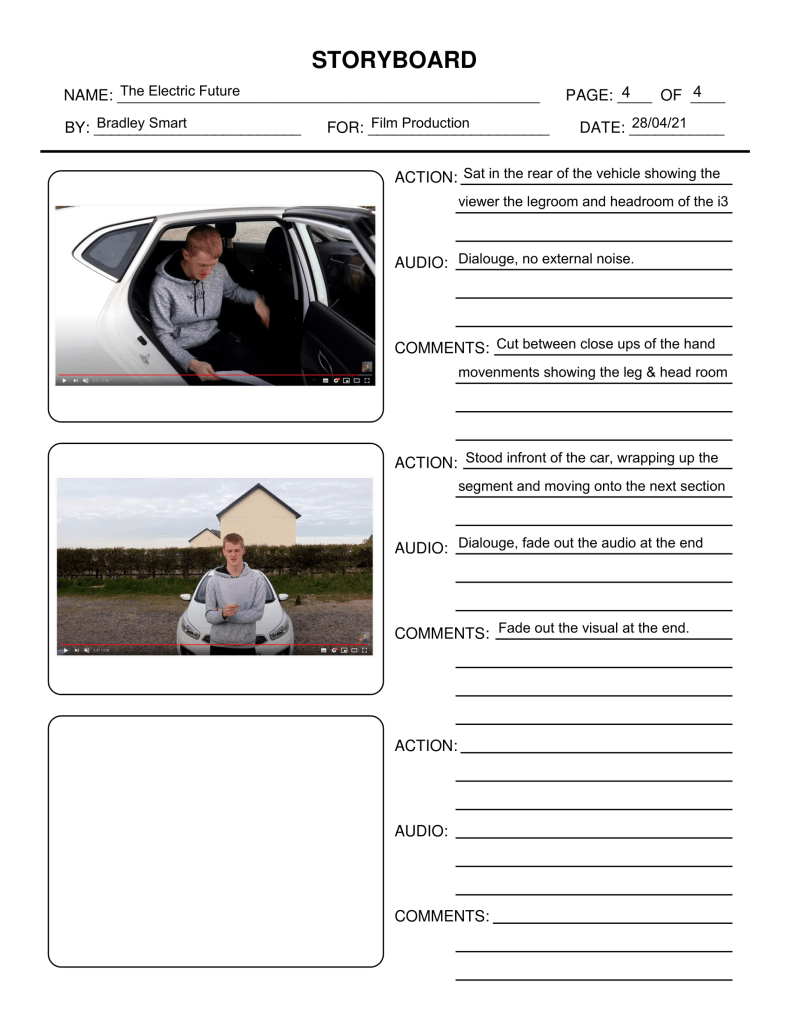
There is also a ‘Shot Plan (Review)’ powerpoint which outlines the different angles as to which I will shoot, this is included in the link below.
View all of these documents as PDF’s: https://adexecollacuk-my.sharepoint.com/:f:/g/personal/bradleysmart_exe-coll_ac_uk/Eu1e5RDBbypMpHDfGGfnKB4BEsBPDWpaOPkeG8XhzK0UoA?e=gR93ag
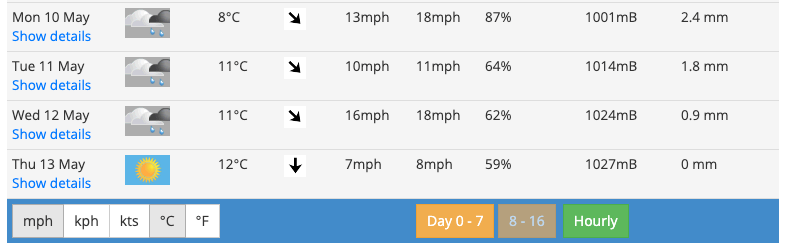
Looking at a predicted weather forecast it isn’t looking good for the days where I film outside, using an umbrella may have to be an option and for the cinematic section filming during the dry spells. I will keep an eye on this over the next week keeping my fingers crossed that it improves.
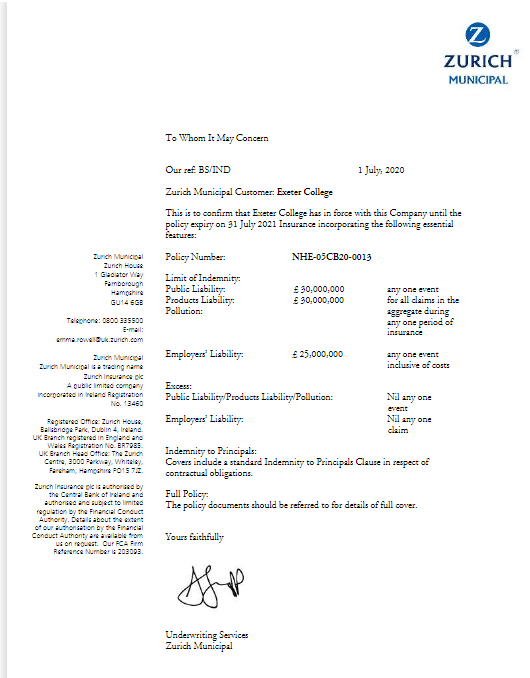
The above document is Exeter College’s public liability insurance which should cover any college activities. This means for me that any activity that I conduct as a college project is covered by this document. It is good to have insurance because it is an added level of security when performing any and including risky actions. For example when filming out the rear of a car, if something flies out and punctures a member of the publics tyre, the cost to repair the tyre is covered by this.
Test Shots
In total I did four sets of test shots.
First of all I did some static test shots showing off the details of a different car (not the one that I will use in the documentary) so that I can get to grips with some of the equipment that I will be using. And editing and how the format of the final video will look. The car I filmed is the camera car that will be used during the moving test shots and the moving shots of the i3 within the final video. This was the only car available to me at the time and is why I didn’t film the car that will be recorded during the moving test shots. When creating these shots in post-production I applied a LUT (LookUp Tables) which is a colour profile which alters the colours and brightness and overall changes the look of an image. These are good because within the editing process you can apply the same LUT to multiple clips to achieve the same effect, a common result when using a LUT is that it will make the image seem clearer and commonly more unrealistic but more desirable and vivid to the eye with more colours. Another editing technique that I decided to test in this video was speed ramping this is where the same video speeds up and slows down without cuts, I believe that this technique has good effect but I don’t believe it will suit my style of video as it is quite cliché and commonly used.
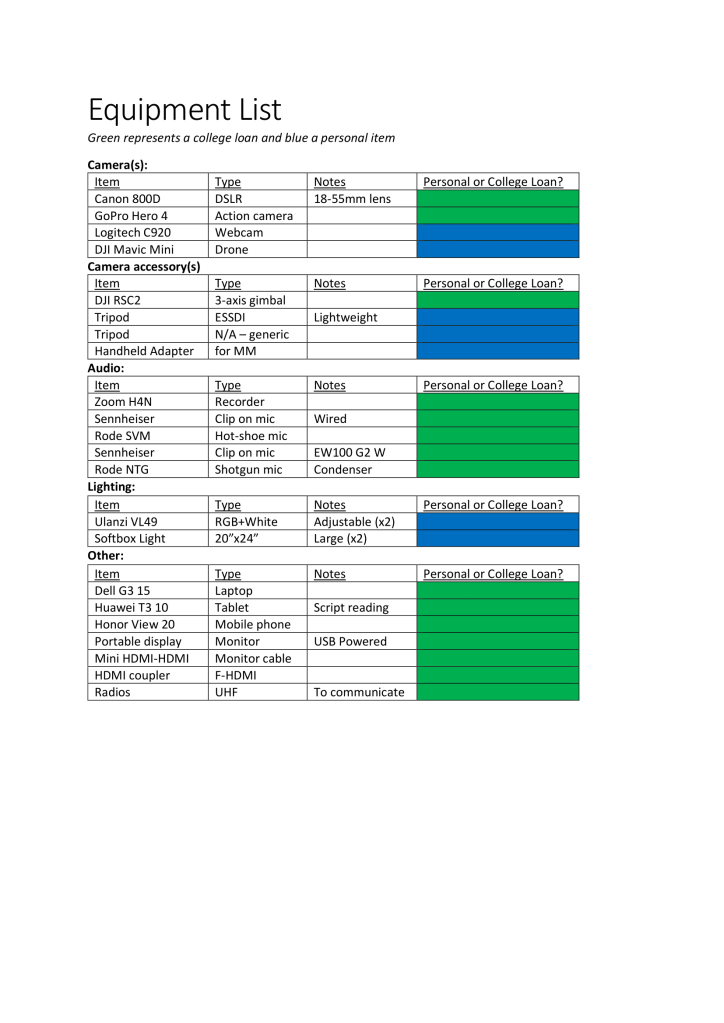
To produce these test shots, I used my Mavic Mini drone with the handheld stabilizer attachment which is in the production costs, I then imported the footage into Adobe Premiere Pro which I then added a music track and applied the LUT. The video is very short in length however this was the first time I had experimented with car videography and wanted to get to grips with it before I filmed more intricate test shots.
Equipment Used: DJI Mavic Mini, DJI Mavic Mini Handheld Adapter
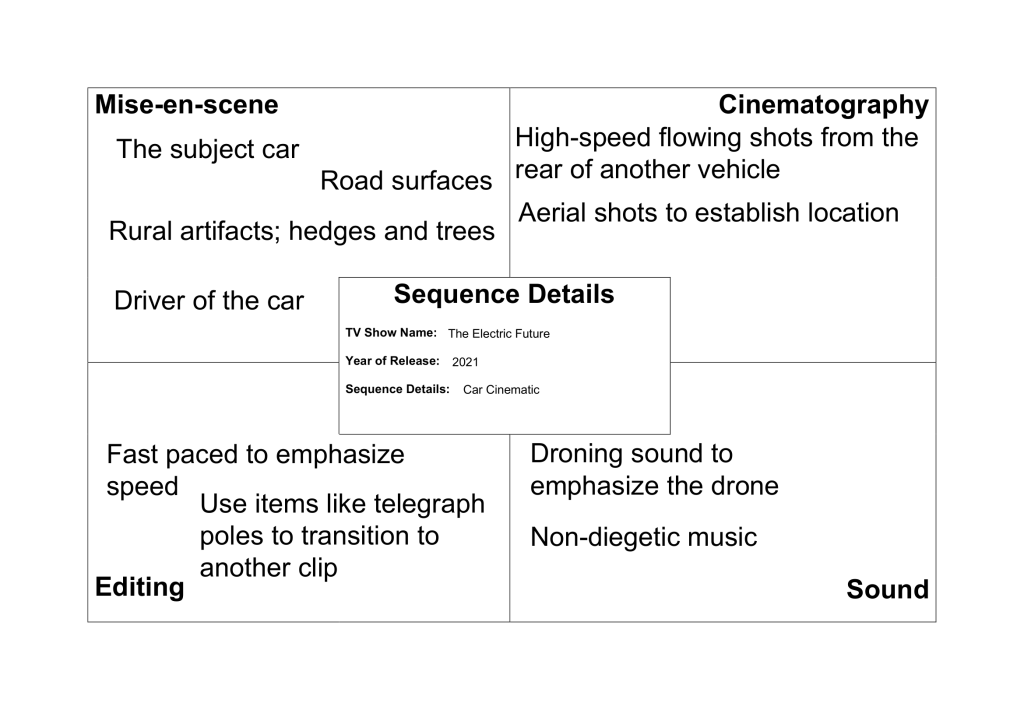
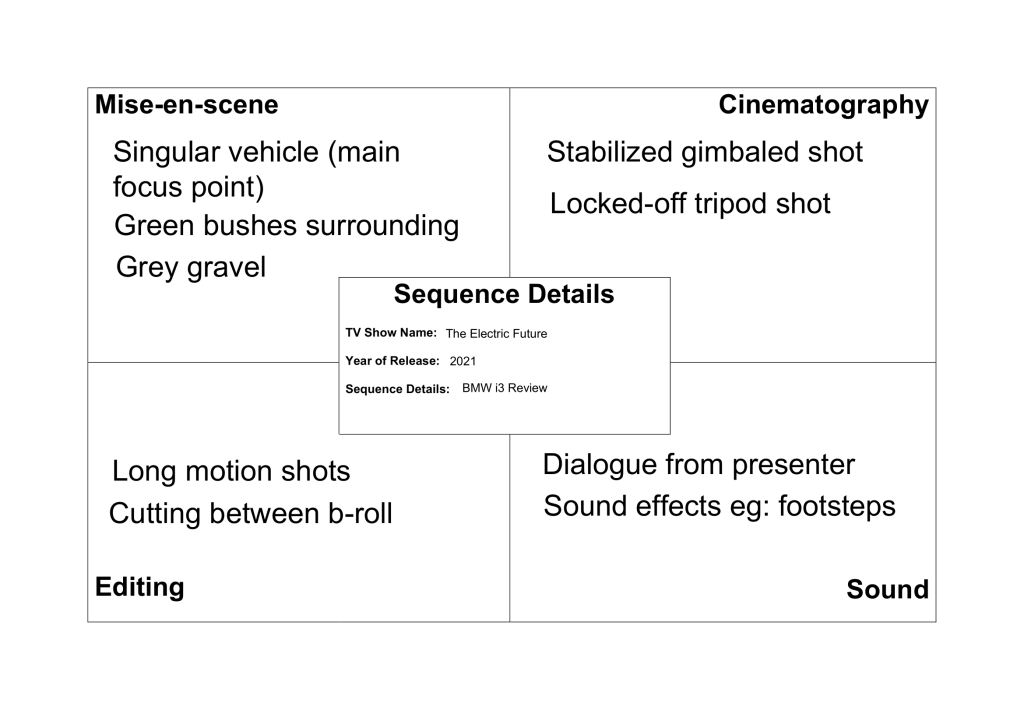
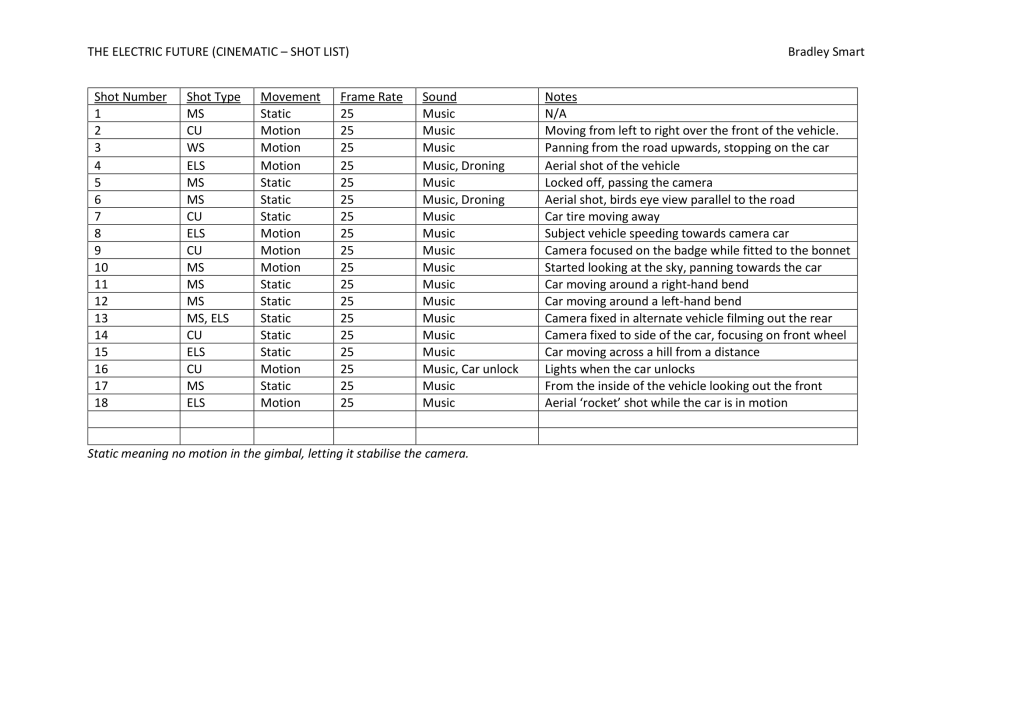
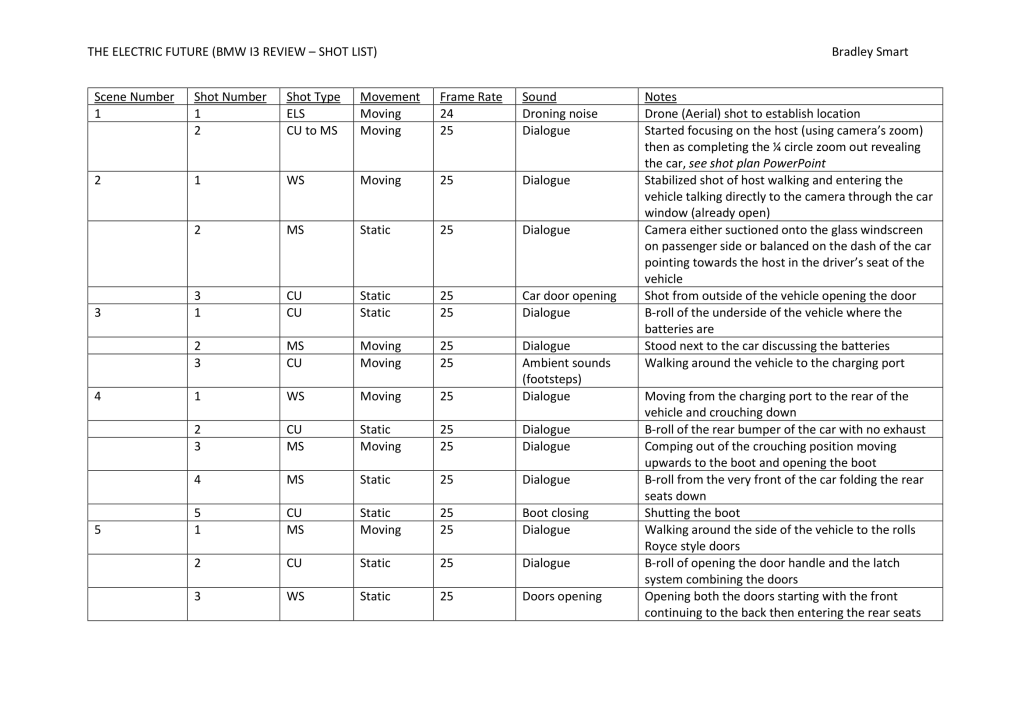
Secondly, I created a PowerPoint document and a shot list for the ‘car review’ section (this can be viewed above), which will help with filming and will be a reminder of which shots I need to get. The shot list is correctly formatted and also helps to show and describe certain shots in more detail as they may not make sense written down in the short list. This PowerPoint also helps to describe the moving shots and what they should look like in the final video. When filming these test shots, it was good to get to know the equipment that we could potentially be using in the final video, by learning how to use this technology it will mean that when filming the final video we are more efficient and know what to do. I would say that this was moderately successful because it helped us in the technological side of view, and also helped me to become more comfortable in-front of a camera which is something I have struggled with in the past. However, the main downfall with this set of test shots is that I was reading from the script as we didn’t have large amounts of time as we had planned to run through it twice in the time we were on location. To combat this in the final video I plan to read the line or paragraph over in my head multiple times so that it is in my head, then to move the script out of shot so it is not visible to the viewer and present that scene/shot to camera, and to use this method throughout the whole shoot. We also had some issues with the gimbal balance which you may notice in the video below where the gimbal wouldn’t hold the position straight as I would have liked it to. This is possible to fix in post-production especially on the ‘roll’ or rotation axis as Adobe Premiere Pro has a feature where you can manually set this yourself, and then scale the video in (zoom in) so that you are not left with black triangles where it has been rotated. Another note I have taken from doing this test shots is making sure the scenes are all filmed in chronological order, by this I mean filming them all in the order that they appear within the script as for example things like car doors could be open when they were shut in the previous scene, you may be able to get away with this for smaller objects however with larger ones such as doors it is highly likely that people will notice and that it can ruin the final video. Unfortunately, we did go away from the shot list/plan in places but only where I deemed it necessary. For example, instead of setting the camera on a tripod to film the planned static shots, instead the camera man held the camera on the gimbal very steadily as best as he could so that it appeared like a static shot. When I film the full-scale production for this video I will be using a tripod for these shots, there was also another shot that was missed, this was the aerial drone shot of the vehicle entering the filming location, however this wasn’t possible with the time constraints and also we didn’t have a qualified driver available. In summary I would say that these test shots were successful but only as test shots, I wouldn’t be comfortable using these shots in the final video as they aren’t as accomplished as I would like them to be, and they’re also of the wrong vehicle. But hey, that’s what test shots are for. I also plan to use all the same equipment in the final video that I used in these test shots, there isn’t anything more that I think is or isn’t needed. I am very pleased with the audio quality from this test. It assures me that I will use these microphones in the final production.
This is a very rough cut, but gives me a very good idea as to the length and how the final video will turn out, it also helps me be more comfortable on camera. I believe that all of the shots and cuts/scenes are well thought out and that this set of test shots were very successful.
Equipment used: Canon 800D, DJI Ronin SC-2, Sennheiser EW100 G2 (Radio Mic), DJI Mavic Mini
The third round of test shots I completed were of the for the cinematic section, more specifically using two vehicles and filming out from one of them focusing on the other, this is something I plan to do to show off the BMW i3 (electric vehicle). Rather than getting just static shots of the vehicle I also want to get motion which is where this set of test shots come in, the only complication with this is that rigging the camera is very complex and creating a system and environment that works can be tricky, however even after taking this into account I believe that the solution that I have come up with works well for what I need. As you can see from the pictures and video below, the camera was rigged into the rear of a car (in the boot area), to start with I placed a tripod in the rear of the car with the legs as far spread out as possible, this means that the centre of gravity is much lower and that it is less likely to topple over if the car accelerates or brakes harshly, on-top of the tripod I then attached the 3-axis motorized gimbal which kept the camera level and steady throughout all of this shoot, I can also control the movement of the camera with an app through my phone to capture smooth panning shots and others like this, (like at 3:51 https://youtu.be/RkTNJzH1DIw?t=231). Another issue I was made aware of and thought of an imaginative solution for is that I had no way of originally viewing the cameras live feed, as it would be unsafe to not face out the front of the vehicle while it is in motion. I used a small compact USB powered display connected to the camera (which you can see pictured below) to view the live feed without facing a safety risk. The Canon 800D uses a Mini HDMI connector as the camera is too compact to use a full-sized HDMI cable. The monitor also uses a Mini HDMI input; however, I did not have a Mini-Mini cable and if I were to purchase one, I would rarely use it, I did have two HDMI-Mini HDMI cables, so I purchased a HDMI coupler which joins these two cables together to make them act as one long cable, you can see this in the production costs sheet. This worked flawlessly in practice and didn’t fail whatsoever and provided a clean and responsive display of what the camera was seeing. Back to how the camera was secured… Although it is already unlikely to fall over/out of the rear of the vehicle, I believe it is better to be safe than sorry, so I then use ratchet straps connected to the four tie down points in the rear of the camera car to secure it further, the camera wasn’t going anywhere. To demonstrate how this whole process worked I used a GoPro Hero 4 inside of the camera vehicle positioned so that you can see the camera and myself operating it, I have also then combined this footage with that from the main feed (Canon 800D) and also the dash camera that is fitted in the car that was being filmed, this helps show the distance between the cars, and gives a more complete view of what’s going on. Below is the full uncut test shots that I filmed for this segment, please see the YouTube description for timestamps to skip to certain points in the video.
Equipment used: Canon 800D, Ronin SC2, Tripod, GoPro Hero4, 2x HDMI to Mini HDMI cables, HDMI coupler, USB-C 14” display.
The video below is my top picks and shots from the test shots I produced, I have also added a colour profile to this to see what it looks like. On-top of that I have also added a stabiliser effect to help smooth out the bumps in the road.
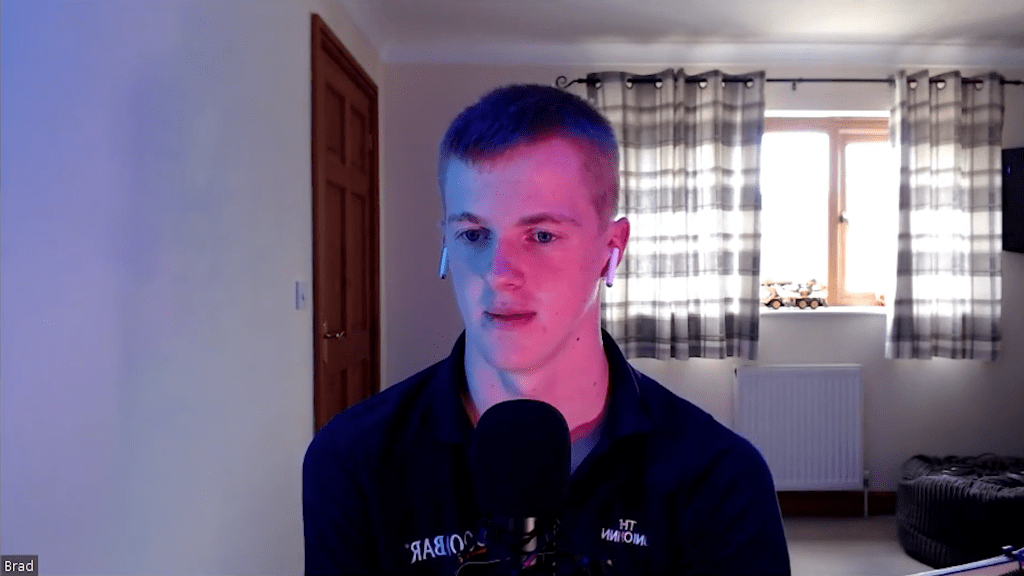
Next, I decided to work on a way of lighting myself which would be effective for remote interviews, with interviews conducted via video calls they can often seem dull and uninteresting, however I didn’t want this to be the case with mine. The use of colour in film is something that I think is more important than most people realise. I cannot control the interviewee’s lighting and I think that it would be rude or inappropriate to ask them to move or change location so that the lighting suited me, this would only be necessary if I truly believed that their lighting would have a negative impact on the final video. At my desk I have RGB lights, this means that they can change to any colour I wish with a voice command, I used this in combination with the Ulanzi VL49 lights which I recently purchased (these can be found in the production costs section). For the key lights I used a turquoise colour to light the left side of my face, and on the opposite side pink, this combination of two colours in my opinion gives an outstanding effect, I then used natural light as a back light, this helped to light the rest of the room but also lights the back of myself so that the edges of my clothing and skin don’t seem, finally as a fill light I just used my computer monitors set to 100% brightness, I believe this combination of lights looks much better rather than just white light to light a subject. Please see the images and video below which describes the different lights.
Equipment used: Ulanzi VL49 (x2), Logitech C920

There is also another set of test shots within the production journal under (04/05/21).
Production practices impacted by COVID-19
My production has been designed in an independent manor, by this I mean that it has been done so that I can produce it within my household and people I am already allowed to come into close contact with, a good example of this is for the driving scene and for this I am using my family members to drive the vehicles instead of external drivers. There are specific guidelines for filming during the pandemic however I have and am still aiming to avoid this guidance as it will not be required if everything is done internally.
Another issue is that the current roadmap for covid could change, at the moment I am permitted to meet people outside, but this could change at any point. If these rules did change, I would take a closer look at the guidance set out by the BFC (British Film Commission) and follow this. However, at the moment for the section where I film with one external person this is outside and we are able to do this under the current regulations. As an EXTRA safety precaution, we will both take lateral flow coronavirus tests provided to us by our colleges so that we both have a rough indication that we are not passing on the disease.
There are no specific issues that covid is having on my production however I am taking it into consideration in every aspect of the filming process as it should be considered. As mentioned in the first paragraph my production has been designed from the ground up to be very independent which has helped me a lot when considering covid regulations.
Throughout the time I have spent working on this section I have also added to the: research bibliography, production journal and production costs.
References:
